Friday, March 30, 2012

Super Fancy Deviled Eggs


When I was about 12 I stumbled upon a way to make your deviled eggs more fancy when you eat them.  It had always bothered me that I worked so hard to make such pretty Easter eggs, and the only one who got to see my hard work was my mom as she peeled them to make deviled eggs.  One time I accidentally dropped the hard boiled egg on the counter, but dyed it anyways, and I was amazed at what happened; the egg itself got colored (not just the shell).  I've been doing it intentionally ever since, and have come up with a few different techniques to make some cool looking eggs.

Supplies (for the coloring part)
1 container per color (like a coffee cup)
1/2 cup warm or hot water per coffee cup
1 Tablespoon vinegar per cup
hard boiled eggs
Food coloring - NOTE: be careful what colors you choose, too much yellow or light green and the eggs just look sickly
Paper towels (I used the leftover bits from making the baby wipes from my very first post)
Newspaper to cover your counter (not shown, but would have been a good idea)


Put 1/2 cup of warm or hot water in your coffee cup and add your food coloring (I did 3 drops red and 2 drops blue for a purple color)


Drop your egg on the counter or mush it between your fingers to get a lot of cracks in it, the more the better.  You need to crack it fairly hard so that the membrane under the shell gets cracked too, the membrane just under the shell is not water permeable, so the dye will not go through anyplace where the membrane is still intact.


Gently place your egg into the dye and let it sit there as long as you like.  The longer you let it sit, the more vibrant your color will be and the farther into the egg white it will go (when i was a kid I forgot one once for half an hour in the dye and the color was a good half inch into the white part)


Carefully pull your egg out and towel off any extra liquid.  Let it dry and then peel it.


OK, so I should have left it in longer so that it showed up better on camera (the egg was only in for about 2 minutes), but if you look closely you can see a light purple crackle pattern (its very pretty in person, it just didn't photograph very well)


You can also peel the egg entirely before you dye it, this allows for more vibrant effects.


Top center egg - Place egg in dye bath in lighter color (light purple as prepared above), add one drop of the darker color directly on top of the egg while it's in the cup, let it sit for a minute or two

Bottom right egg -  4 minutes in the light purple dye prepared above

Bottom left - Crackle egg from first part.


If you get distracted during dying and wind up with some egg dye on your counter, pour some rubbing alcohol onto it (a pretty good amount) and let it sit for a couple of minutes.  Wipe it up with some paper towels and its gone :-)


To make your now FABULOUSLY gorgeous eggs into deviled eggs you need:
Mayo or miracle whip
Mustard (I mix horseradish mustard and yellow mustard, but you can use what you like)
Paprika
your eggs
a serving plate
a bowl
a fork 
a knife
a Ziploc bag (sandwich size if you're just doing a few eggs, if you're doing a dozen or more you'll probably need a quart or a gallon bag.  A pastry piping bag would also work)


Cut your eggs in half and put the yolks into your bowl


Add a forkful or two of mayo and a half a hot dog's amount of mustard (I don't measure, its all about texture and taste, so just kind of eyeball it)


Mash it all up and stir it together.  Make sure to taste it to see if its a consistency and flavor that you like, adjust as needed.  Scoop all the filling into your Ziploc and snip the tip off of one corner.


Put the bag into the egg cavity and gently squeeze to fill the egg.  Have fun with it, make some swirly, some big ol' blobs, some with dots, etc.


Sprinkle the tops with paprika and TA DA!  Beautiful, one of a kind deviled eggs that make a wonderful addition to any springtime feast.


Oh, and if you're wondering what to do with those leftover deviled eggs after your feast is over,  throw them all into a reusable container (like a glad box or Tupperware) and chop them up and you get some festive egg salad!


Saturday, March 24, 2012

Jar Pin Cushion

I was wondering what project to do next, when I looked at my gigantic pile of tangled and mismatched pins and had an idea.  I wanted a way to keep all of my pins together but sort them, with the ones I use being accessible easily, while the ones I inherited that I don't really use much put away, but still available if needed.  My solution was to use a little mason jar with my straight pins in the glass container and a pin cushion on top for my usable pins.  Here's how I made it.

Supplies:
  • Mason jar, Ring, and Lid pieces
  • Scrap ribbon
  • Pin
  • Needle &Thread
  • Fluff (poly fill or fabric scraps even would work)
  • Fabric (a large-ish fabric scrap would work, enough to cover the entire jar give you plenty of extra to work with)
  • Pen, pencil, or fabric marker
  • Scissors


To determine the size fabric you will need, wrap the ribbon around your mason jar ring one and a half times (this doesn't have to be precise, the smaller you make the ribbon the shorter your pincushion will be, if you want it big and puffy, like a marshmallow sitting on top of the jar, make the ribbon longer, if you want it tighter make the ribbon shorter)


Place your pin into the ends of the ribbon and into the center of your fabric to make a rudimentary compass.  Trace a circle onto your fabric (please ignore the mess on the floor in this picture, I need to do some cleaning)


Cut your circle out

With your needle and thread, sew a running stitch around the edge of the circle leaving a bit of a tail at the start and end points.


Put some fluff and the lid to the jar inside the circle and pull the strings tightly to close them in.  Knot the two strings together and cut off an excess.


Slip the ring over the lid and pull any excess fabric or fluff up to the top where the pincushion will be.


Screw the lid onto your jar (it may take some force to get the ring to catch due to all the fabric that is now in the way) and decorate if you'd like (your ribbon should be just about the right length to fit around the lid)


TA DA! Brand new pincushion with storage underneath!


Happy Crafting!

Thursday, March 22, 2012

Baby Quiches... Kindof

Sorry about the delay on posting things... my computer got a massive virus then our water heater stopped working and we had to get our circuit breaker box replaced (so I'll be crafting with what I have, free and/or found objects for a while).  But before I get back to crafting, I've got to fuel up (without going to the store for a while).  So here is an easy dinner with that in mind, using things that I already had, creating a dinner that wasn't planned.  Its kind of a quiche, and can be totally customized to whatever your tastes are.


Ingredients:
5 Eggs
1/4 cup of Half and Half
Salt
Pepper

Optional:
Lemon Juice
Basil
Chives
Tomatoes
Garlic
Shredded Cheese (not in the picture)

Tools:
Fork
Knife
Greased Muffin Pan
Bowl


In your bowl crack and scramble your eggs, add in your half and half and sprinkle salt and pepper in (about as much as you would put in for scrambled eggs).  Beat the mixture really well, you want to make sure there aren't any little lumps of egg white in there or you'll get random egg white lumps in your quiches.


Divide your egg mixture between 6 muffin spots.


Add your filling.  I added basil, chive, tomatoes, a little splash of lemon juice and topped it off with some shredded cheese.


Bake in the oven for 25 minutes at 375 (or until they puff up and are a bit golden brown on the top)


Run a knife around the outside of the baby quiche to loosen it from the pan and pop it onto your dinner plate.

TA DA baby quiches, full of protein and pretty darn tasty if I do say so myself.


This recipe will serve 2 people if you add some frozen veggies on the side, or you could add veggies and a starch (like mashed potatoes or rice or orzo) and feed 3 people.

Tuesday, March 20, 2012

Flower Thimble Necklace

So one of my MOST favorite accessories lately has been my thimble/flower necklace.  I've gotten lots of compliments on it and have even sold a couple on Etsy (a link to my store is on the right).  I thought I'd share with you crafty folk who may have some extra pins and an extra thimble lying around how you can turn that into a really awesome looking accessory within about half an hour or so.


Supplies:

Drill
Super tiny drill bit (smalest that you have, i think mine's like 5/32nds)
Pins
Thimble
Jump Rings (i recomend 2, otherwise it hangs crooked)
Pliers
Wire Cutter
Glue Gun
Green thread (for "grass" to cover the glue)


Drill 2 holes in your thimble, almost the full diameter of the jump rings down from the top.  Don't do the holes directly opposite each other, have them about as far apart as you would draw eyes if you were turning it into a face (i know thats kindof a weird way of putting it, but if you put them too far apart it looks kindof like mickey mouse is hiding behind your thimble, and if they're too close together the jump rings won't hold it level on the chain)


Insert your jump rings and put the joint inside the thimble, so that when you fill it with glue, that helps to hold it shut.


Snip off the tips of the pins, do different lengths so that your flowers will be at different heights.  Cut all the pins you want to use down before moving on to the next step and double check that you like their height in the thimble.  Make sure to cut a couple of them a little bit shorter than you want them to be, because as the glue cools it gets harder to get the pins all the way down to the bottom of the thimble (and you have to move fairly fast)

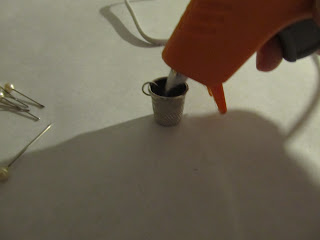
Put a BIG dollop of glue into the bottom of the thimble (usually 3 or 4 full pumps of the glue gun) you don't want to fill it all the way up, but if you use a fair ammount of glue it stays warmer longer.


Place your pins into the glue arranging them as you go (the first few will tip over, get a few more in before you go back to straighten them back up, as the will kindof prop off of each other as the glue cools)


Add a little more glue to the top of the thimble around the pins (try not to get it onto the outside edge of the thimble) and add your thread.  Wrap it around and between the pins making sure to get it stuck to the glue before it dries.


TA DA!  Enjoy your beautiful new spring pendant!

 Happy Spring Everyone!

Monday, March 19, 2012

Pac Man Play Gym (LONG)

Sorry this is so long, but it's kind of detailed.

So I've been in the market for one of those exercise play gyms for the baby, but they were all expensive, so I decided to make my own.  I wanted it to be cushy and soft, so I decided to use fleece as the base, but, since cash is tight, I didn't want to go out to buy new.  I was digging through some of our old things and came across this old picture from Halloween of my husband (isn't he handsome :-) ).  I remembered that this pac man had been made of fleece and we even still had the hula hoop that was used to give it that shape that I could use for the cross bars to hang toys from.


 If you want to make one of these yourself, what I used to create this pac man was a standard hula hoop and I think 2 yards of yellow fleece (or just double the diameter of the hula hoop). Trace the hula hoop onto the fleece and stitch on your line leaving a space open for head and legs. Cut arm holes (if you're nice, I almost didn't because pac man doesn't actually have eyes, but I decided to be nice because he was willing to wear a hula hoop the very hard way all night and not really sit down (it goes between his legs and over one shoulder)). At the time I made the pac man I wasn't planning on it becoming a baby play gym, so I glue gunned the black wedge for the mouth onto both sides, but if you have time I recommend sewing it on instead.


To transform this bad boy into something for my sweet pea, I turned it inside out then re-stitched around the outside of the circle cutting off the old hem and leaving an opening for turning (I had to do this because when I made the original costume I didn't sew it, I glue gunned it because my sewing machine was broken at the time and it was like the day before Halloween. If you have just made your pac man, you won't need to do this).  Also make sure to fill in the eye hole if you cut one with some black fabric so there isn't a big gaping hole in the play mat, I forgot to take a picture of that step.


Put a thin quilt batting (or leftover pieces from an old project pieced together like I did) over the entire pac man and stitch around the outside again to hold all the batting in place


When you're stitching on the batting, if your presser foot keeps catching on the fluff of the batting, put a piece of tissue paper down over the batting and stitch through it, when you're done, just tear it away.  As you sew, the needle punctures it like a perforation so it tears away nicely.


Turn the pac man right-side-out and stitch around the edge one more time (last time I promise), making sure to tuck the edges of the opening in so they are tucked in nicely too.


I didn't like how easily the layers separated, since I was going to use it for a tummy time mat too, so I decided to do a little quilting to hold all the layers a bit tighter together.  I cannot draw at ALL, luckily my husband is a Herron School of Art graduate (www.joebieschke.com) :-) (not that he really needed a whole lot of training for this, if you didn't have a resident artist, you could print out pictures to trace).  I had my husband draw (with disappearing fabric marker) the 4 ghosts and some dots all over the pac man (he also drew some cherries, but I wound up not sewing them on because I was tired and it looked cute anyways).


Stitch over all your lines, if you're using fleece and batting I recommend a zigzag stitch (a straight stitch line disappears into the fleece, so if you want to actually have a black outline on the ghosts, you need to zigzag).


Spray (or brush, however your fabric marker directs) your piece with water to make the marker go away.  My husband was really heavy handed with the marker so it took 5 or 6 sessions of soaking it really good with a spray bottle to get the ink all the way up. Let your mat completely dry.

Place your baby on your finished tummy time mat and enjoy.  This is a vital step, view it as trying it on.  Watch him (or her) for a little while and take a sewing break, the next steps won't change the mat itself any so let your baby enjoy for a while (i took about a 4 day break before I moved on, I got caught up in enjoying the weather).


To make the cross bars for the play mat, cut a hula hoop in half. An exacto knife works very well, just be careful not to cut through and cut yourself or the surface you are working on.  If you have a cheap hula hoop, make sure to cut through where the tag/label is, that is the joint where the hoop is stapled to a little filler piece anyways, and would be a natural weak point if you were to leave it in. take one half of the hoop and cut about an inch or 2 off so that when the two haves are crossed over one another all the end points can touch the ground.


Cut (or piece together) two long pieces of fabric an inch or so longer than your hula hoop halves and whatever the diameter is plus an inch long (in my case 53 inches long and 3 1/2 inches wide)  I used leftover fabric from the body and eye.  I also sewed a long ribbon (about 12 inches long) onto the center of the lower hoop sleeve (so that I could tie the bars together securely).  If you use satin ribbon like I did, to keep it from fraying, take a lighter or candle and carefully melt the edges a little (see my flip flop tutorial for good pictures of this).


Pin your hula hoop half covers in half the long way with right sides together.  Using more ribbon (about 3 - 4 inch pieces)  melt the edges again and make little loops,  Pin them into your hula hoop covers so that you have places to hang little toys on the final piece. Make sure you pin them with the loop to the inside of the tube as you sew it.


Once you have the whole tube pinned, stitch down the whole length of the tube, but do not stitch shut the ends.


This is the most tedious part, turn your tubes right side out.  It can take a little while, just be patient.  I recommend sitting in front of your favorite TV show and turning the tubes as you watch, it makes the task seem shorter.


Put your hula hoop halves into the tubes and try them out (but don't let the baby try it out yet, the hoop halves can tip over onto them, it probably wouldn't hurt them outright, but it wouldn't be safe and it would probably startle your baby).


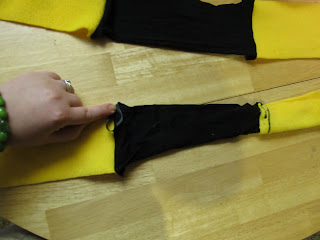
To stop the hoop halves from tipping over I took some spare ribbon I had (but you could use string or a fabric that doesn't have any stretch to it, whatever you have, it'll only show a little around the edge of the mat) and stitched it to the ends of the tubes (with the hula hoop inside) making sure the ribbon is pulled tight so that the hoops have some tension to their arc.  Also stitch where the two ribbons cross, this, plus tying the two hoops together on the top keep them from tipping over onto your baby.


Then add some of those baby link thingies to your ribbon loops and attach some toys for your baby to play with. 


TA DA!  Enjoy your new custom play mat for your baby :-)


Enjoy the last full day of winter and get ready for some fun spring and summer projects!  Happy Crafting!